Draggable Div with XState and React
31 January 2023
Updated: 23 December 2025
Why State Management
Recently I’ve been interested in understanding non-standard user interactions and about how different applications develop this functionality. A particularly good example for me has been looking into the codebase for TLDraw where I ran into state machines
Now, I’ve played around with a few state machine libraries and I’m fairly familiar with them and have implemented some fairly simple examples for working with multi-step forms and the like, but I haven’t really used them in the specific context of designing state
The State Designer Library mentions the idea of Designing State which suggests that the design of how the user interface should work and the implementation of it should be treated as independent, in order to do so, we should design the states that we would like to work with separately from the UI that implements the state
This provides us with a decent abstraction which should make things about state a lot less tangled and easier to reason about
XState
State management libraries provide us with a set of abstractions and tools for designing state. There are a few that are commonly used, of which I’ll be using XState in this post. XState has pretty good TypeScript support as well as some great tooling for visualizing and designing state on Stately
The Problem
For this post I’ve chosen to build a simple draggable div component that makes use of XState. The idea here was to get a feel for the library and see how it can be used to tackle problems around UI interaction
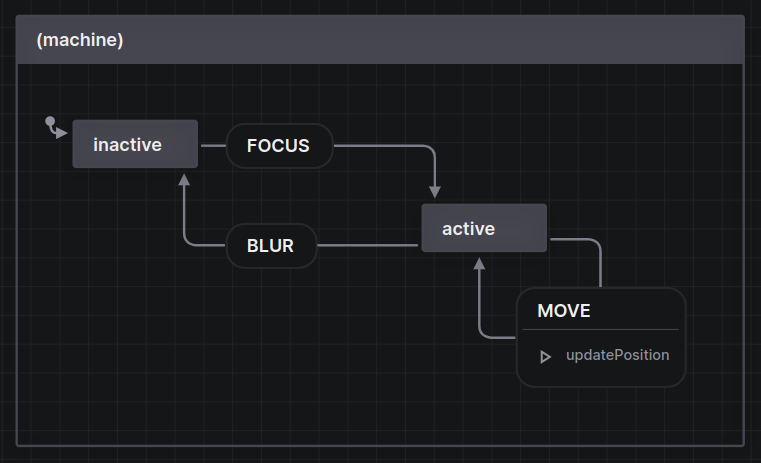
Visualizing the State
Defining the state can be done using the XState visual editor that can be used in VSCode or Stately, this is useful because it lets you visualize different ways that the state can be represented in a relatively low-friction setting
The structure I’ve decided on for the representing my component’s state can be seen below:
State Machine Code
The code for the above state machine, with some added type information, can be seen below:
Draggable.machine.ts
1import { createMachine, assign } from 'xstate'2
3type Position = {4  x: number5  y: number6}7
8type Delta = {9  dx: number10  dy: number11}12
13type Focus = {14  focused: boolean15}16
17export const machine = createMachine(18  {19    schema: {20      context: {} as Position,21      events: {} as22        | { type: 'MOVE'; position: Delta }23        | { type: 'FOCUS' }24        | { type: 'BLUR' },25    },26
27    initial: 'inactive',28    states: {29      inactive: {30        on: {31          FOCUS: 'active',32        },33      },34
35      active: {36        on: {37          MOVE: {38            target: 'active',39            internal: true,40            actions: 'updatePosition',41          },42          BLUR: 'inactive',43        },44      },45    },46  },47  {48    actions: {49      updatePosition: assign((context, event) => ({50        x: event.position.dx + (context.x || 0),51        y: event.position.dy + (context.y || 0),52      })),53    },54  }55)
In the above, we can also see the following:
- An
initialstate that isinactivewith an event ofFOCUSwhich sets the state toactive - An
activestate that has an internal event ofMOVEwhich will trigger theupdatePositionaction and an event ofBLURwhich sets the state toinactive - There is a
contextthat will store the coordinates of the dragged element - An
actionsobject which has an action calledupdatePositionwhich assigns the context to the new position
We can also see that in the schema the type of events is specified. This makes it so that XState can infer the type of event passed to the updatePosition function
Attach the State to the UI
In order to move from one state to another we use the send method from XState
To use a state machine in React we use the useMachine hook from XState:
Draggable.tsx
1import { useMachine } from "@xstate/react";2import React from "react";3import { machine } from "./Draggable.machine";4
5interface DraggableProps {6  children: React.ReactNode;7}8
9export const Draggable = ({ children }: DraggableProps) => {10  const [current, send] = useMachine(machine);11
12
13  // rest of component
Next, we can use the current to figure out if we are in an active state so that we can do some styling based on that:
Draggable.tsx
1const isActive = current.matches('active')And lastly we can hook up the UI Events to the state machine:
Draggable.tsx
1export const Draggable = ({ children }: DraggableProps) => {2  const [current, send] = useMachine(machine)3
4  const isActive = current.matches('active')5
6  return (7    <div style={{ position: 'relative' }}>8      <div9        onMouseDown={() => send('FOCUS')}10        onMouseUp={() => send('BLUR')}11        onMouseLeave={() => send('BLUR')}12        onMouseMove={(ev) => {13          send({14            type: 'MOVE',15            position: {16              dx: ev.movementX,17              dy: ev.movementY,18            },19          })20        }}21        style={{22          position: 'absolute',23          backgroundColor: isActive ? 'skyblue' : 'red',24          userSelect: 'none',25          top: current.context.y,26          left: current.context.x,27          padding: 20,28        }}29      >30        {children}31      </div>32    </div>33  )34}
The above will result in a draggable div like so:
Possible Improvements
If you play around with the above example you’ll probably notice that it’s not perfect. Though the states we’ve defined are correct,the complexity in mapping the UI events becomes apparent, as well as the various edge cases that may arise around how DOM events fire in response to user interaction
Though I don’t aim to solve all of these points for the sake of the example, it’s worth pointing out as a source of exploration. Some possible solutions that may help are things like changing where we listen to specific events, for example listening to the mouseUp events on only the wrapper and not the draggable component, or changing which specific events we’re listening to
The idea is that the handling of the UI events is now separated from the actual state management which should make fixing interaction bugs simpler while also decoupling our state from any specific implementation of the UI
Further Reading
For more information, you can take a look at the XState Documentation or the XState YouTube Course
In addition, I also have a more complex example using XState for building a Todo App